jhipster 설치
이번 프로젝트에서 jhipster를 사용하기로 했다. jhipster는 springboot + angularjs의 기본기능을 갖춘 프로젝트를 생성해준다고 보면 된다.
jhipster를 사용하는 이유는 jhipster가 구성해주는 프로젝트 구조가 지금까지 내가 설정한 프로젝트 구조보다 더 좋다는 판단이 들어서이다.


jhipster는 npm을 통해 설치를 해야한다. 그렇기 때문에 node.js 최신버전이 설치되어 있어야 하고 설치되어 있더라도 예전 버전의 npm 이면
npm install -g npm 명령어를 통해서 npm을 최신버전으로 업데이트 해주어야 한다.
jhipster를 설치하는 방법은 jhipster site에 잘 나와있다.
https://jhipster.github.io/installation/
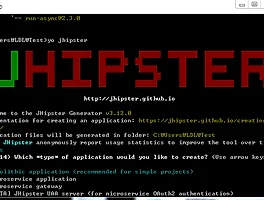
- Installation type에는 4가지가 존재
- Local installation(일반 사용자 전용)
- Local installation with Yarn[Beta]
- vagrant box installation
- Docker installation(고급 사용자 전용)
- 일반적으로 사용되는 Local installation만 진행

에러 없이 모든 패키지가 설치되었다.
'Programming > 과거포스팅' 카테고리의 다른 글
| [JPA] JPA란? (0) | 2016.12.12 |
|---|---|
| [Jhipster] IntelliJ연동하기 -jhipster 설치 (0) | 2016.12.08 |
| MongoDB 설치하기 (0) | 2016.11.22 |
| 몽고디비 스터디 시작 (0) | 2016.11.21 |
| 인터페이스의 역할 (0) | 2016.04.26 |